Sunday, May 15, 2011

Paint Job

We see again in this post, a while after last posting in this blog. As almost all mechanical and electrical jobs were completely done, I have decided to get the cosmetics part rolling for current restoration phase.

The exterior paint job was deteriorated altogether, perhaps the normal after effect of 20 years exposure to rain and sun. Have decided to get it re-sprayed with fresh coat of 2K paint. The job have been carried out last month. The exterior body have been repainted with its original color, dark blue. Nothing was done for the interior as they are still in good shape, only some touchups here and there for the interior paint.

The job started with stripping off old coat of paint, perform undercoating, and resprayed back. Also have taken the chance to change the faded and cracked both front signal marker lamp. Enjoy below pictures! And now I am close to drive a 'brand new' Volvo 940!!


Posted using BlogPress from my iPad

Saturday, April 23, 2011

Junk Yard Sale

ITEM 01. The K-Jet fuel pump, filter, and accumulator steel bracket set for V740/940. MYR 10.


ITEM 02. Instrument cluster for V940 1991-1992. All working except speedometer. You'll need to re-install the clock controller from your original board. MYR 50.
ITEM03. Brand NEW TRW front brake pads. Wrongly bought so not used until now. For S90/V90/ newer 900 series. MYR100.


ITEM04. Volvo 240 Original Cassette Player/AM/FM. No Code required. MYR40.
ITEM05. Stereo faceplate for upperdash Volvo 240, for LHS driver models. MYR 20.


ITEM06. Buttons (Rear view mirror heater & Power antenna) for V740/940. MYR05/pc.
 
ITEM07. Button cover plate for V740/940. MYR 05.
ITEM08. Volvo 240/740/940 B230E/200E Fuel Pump/Filter/Accumulator U-Hose. MYR10.

 ITEM09. Volvo 240/740/940 Brake Servo Hose. The check valve may not work already. Original Volvo hose, still in very good condition. MYR10.

 ITEM10. Volvo 240/740/940 Tie Rod End cover. MYR10.

ITEM11. Volvo 740/940 Dashboard Cloth Cover. MYR10.

ITEM12. Volvo 240/740/940 LHS Side Mirror Plate without Glass. MYR05.
ITEM12. Volvo 240/740/940 B230E/200E Volumeter Gasket. Brand NEW. MYR20.
ITEM14. Brand New. Ansell Hyflex Glove, good for working with autos. I have 5 pairs now. MYR10/pair.


I am getting off above items at very minimum cost, just to clear off my store space. The above price is in MYR (Malaysian Ringgit) and exclusive of shipping costs. Email me at ahmadzhafri@gmail.com if you are interested in any of above items. Thanks.
Good Day!

Sunday, January 2, 2011

Alternator Won't Charge Without Instrument Cluster!

Hi! I am eagerly going to write on my speedometer board repair later. Its a long whole story and experience. It was so funny that the instrument cluster in this 940 (same goes to certain 240s and 740s I beleive) does significant job to your vehicle runnings. Let me share some of my experiments & PLEASE DO NOT REPEAT THE MISTAKES.

As I would like to have a look at my speedometer circuit board, I detached the instrument cluster altogether. They are just meters! My car still could be started without it, with no air-conditioning. I well understood that the climate control box may be powered from the instrument cluster wires as well, so no big deal. I found my speedometer board having some burnt components, the popular leaky capacitors and a burnt resistor as well. So I left the instrument cluster inside the house, start the car, drive around the town searching for the components. Suddenly after a park, it cranked slower. Oooppss the battery is dying perhaps, dropped by a battery shop while leaving my car engine running in front of the shop. While negotiating the battery price, it dies automatically. So the car told me "DO NOT BUY THE BATTERY!".

Thanks to En Roslan, borrowed me a battery adequately for me to drive home and recharge my weak battery. Know what, it is just because of no instrument cluster, your alternator will not work. The moral of the story is "DON'T DRIVE WITHOUT INSTRUMENT CLUSTER"

No instrument cluster means NO A/C and NO ALTERNATOR
Keep on thinking why on earth the VOLVO engineers designed the system as such. The meters are so important, as without it you cannot drive. Perhaps another safety features for you must be all aware of your car (speed, rpm, temperature, any warning lights) if you want it to get running. If not let the car die by itself and you are denied from continuing your journey, great!

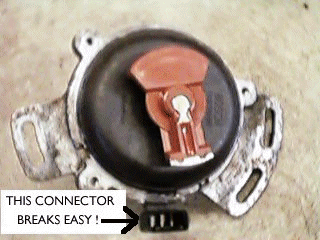
Securing the Distributor Hall Sensor Socket

It is famous that the hall sensor socket attached to the distributor assembly breaks easily off. Mine broke! Before it pursue to get disconnected. Took out the whole distributor assembly. For this you should do this by sequence;
  1. Detach all plug cables and ignition coil cable to the distributor cap
  2. Unscrew the 3 retaining screws on the distributor cap and remove it from the assembly
  3. Unbolt the 2 retaining bolts of the distributor assembly
Be VERY CAREFUL to mark the location of the distributor rotor at the point of removing it. Very slim chance you'll install it wrongly but make sure they are put at their original position back especially the distributor housing. Please really mark it properly, make a line from the distributor to your engine head to ensure no room for mistakes. Remove the distributor assembly by pulling it with even force towards the firewall.

Once removed, I did cleaned them up, inspect for any burns or defects. The unit looks good, except for the broken socket. I applied epoxy type of adhesive to hold it into position, let it dries up overnight and reinstall. Reinstallation is just reverse of installation.

This is what the experts says~~

Slotted from engine head, very slim chance of wrong installation

Backside

Zooming to the hall effect sensing

See the broken socket holder

Done! It sticks there strong!


DONE! Simple DIY to prevent future issues. Good Day all!

Wednesday, December 22, 2010

When You Have To Slam The Door

I always wonder, why on earth that my driver door have to be slammed hard before it could engage properly. The answer is very simple, the locking socket at the door is loose. Very simple solution as well, retighten the torx screw on it, there are two of them.


Solved!